Face Proxy User Guide
 Proxy Face Normals vs default mesh Normals
Introduction
What actually is this?
It is a set of rigged bezier curve profile splines. You place them around your anime character's face and clean Normals are projected from the Curves onto the face. The Normals can be set directly from the Bones, and then the curve placement defines what area gets what mix of them. So no more messing around with rotating individual vertex normals trying to match them to a certain shape, or settling for merely radial/sphere Normals that are clean but too simple. You align the proxy, and then you drag around some Bones until it looks right. Maybe paint some masks for more control. And it can be applied as typical Custom Vertex Normals and exported, or attached to the character rig, posed per shot, or even shape keyed if you're staying in Blender.
Regular proxy meshes can be challenging to customize and control cleanly because there are generally more points than you need. We want a clean curved surface, but we don't want to have to keep every component vertex aligned correctly when trying to make adjustments. Moving the position of vertices while trying to end up with their faces pointing towards a certain shape is fundamentally unintuitive and annoying. And the mesh shape needed to get a clean transfer is often different from the actual shape we want. And the vertex density needed for the transfer can also be more than we can properly manage without distortions. And meshes come with problems related to spacing, topology, and triangulation.
This Curve Proxy method avoids many of these problems by reducing the number of points you have to interact with. We worry only about the control points and let the curve logic produce the rest, much like other parametric workflows. It is effectively locked to only produce simple curved surfaces. In the case of typical female and youthful male Anime faces this is fine because they shade basically like an egg or tapered sphere or cylinder. For more complex faces and expressions more curves and points per curve would be needed, and that is planned for future versions, as are options for surface details like nose and lip shading. And on the technical side, working with curves is more powerful. In a typical setup you transfer the Normals from the Nearest Surface point, which have already been interpolated and stored on the mesh. In this setup, the nearest two curves are sampled at their nearest point, and there is full control of how to interpolate and mix their Normals. Some of these options are already surfaced for the user, and more will be in future updates.
What isn't it?
This tool is still working only on vertex data (so far). It does not resolve any of the typical problems with applied or exported Custom Vertex Normals. If working in Blender, the setup can be kept live and synced with your face rigging to avoid typical deformation issues of Custom Normals and Normal Maps. Vertex level also means that if the mesh lacks sufficient vertex density to support certain levels of detail or angle changes, you will still get polygonization/faceting of the toon shading terminator. It projects the Normals, so most topology concerns are ignored. And Laplacian Smooth and Weighted Normals help with more. But there are still situations where triangulation direction or long faces can cause problems, and the more curvature the more they matter. But you can get away with adding more geometry to resolve these issues relatively easily.
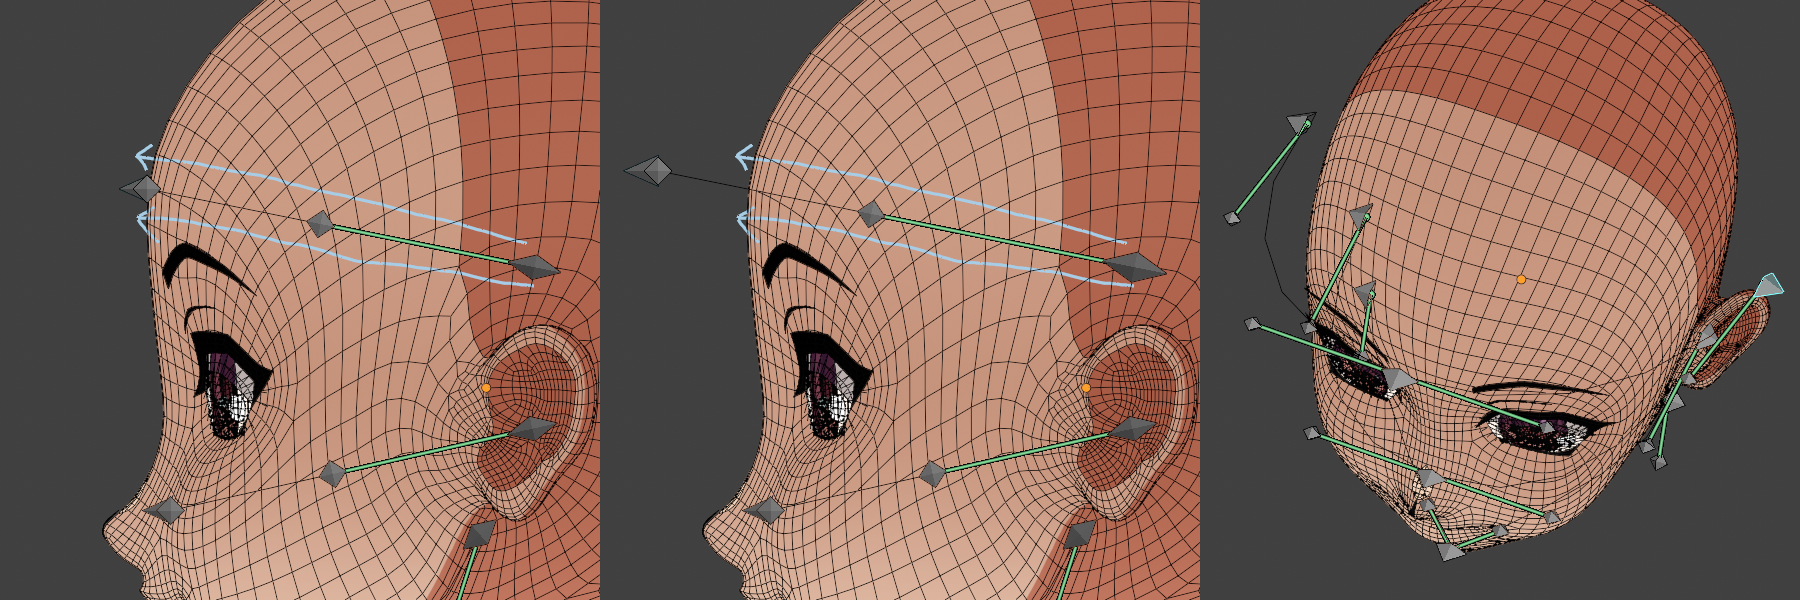
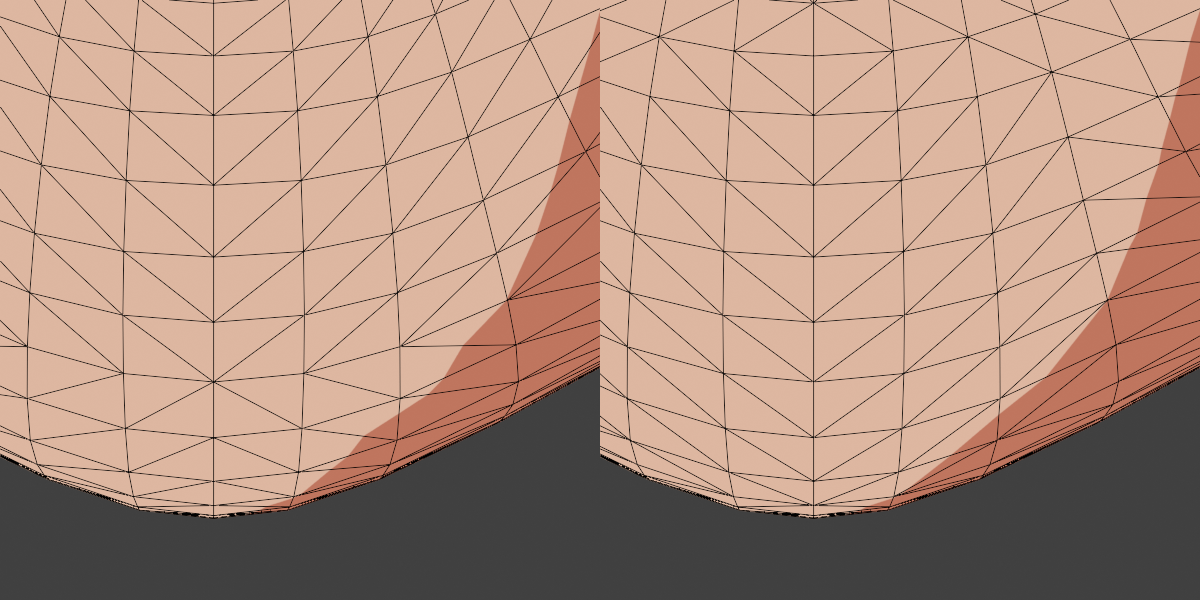 The chin of the model has a lot of curvature and wide rectangle faces. On the left, the triangulation direction is bad because it crosses the typical direction of shading. On the right it is fixed and the problems are mostly gone.
For the initial version of this Proxy system, the goal is to allow you to easily adjust the basic face shading shapes without having enough points or complexity to get anything really bad. There's plenty of room for error of course, but the first step is to have a tool that works properly when used properly, which is a big improvement over methods that don't really work even when used properly, only really work in one usecase, or require such a high degree of precision that they can't be reliably worked with at scale anyway.
So this doesn't do everything yet, but it does an important fundamental very well and relatively conveniently compared to any other method I've found so far. And if others find they agree, then we'll keep building on it.
Setup Guide
Summary:
- Add the Proxy Collection via the addon panel
- Align the various Proxy Objects to your character
- Position the Curves around the face using the proxy's rig
- Adjust the Normals with the rig until it looks right
- If animating and rendering in Blender, attach the Proxy rig to the character's rig
- If using expression shapekeys, you can make corresponding keys for the Proxy
- It feeds into the Laplacian Smooth modifier automatically
Adding the Proxy with the Addon
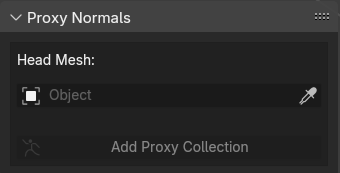
In the Addon Panel, select the Head or Face object. It is best to separate the head from the rest of the body object if possible for easier setup and better performance.
Click Add Proxy Collection. This will Append the various Proxy Objects.
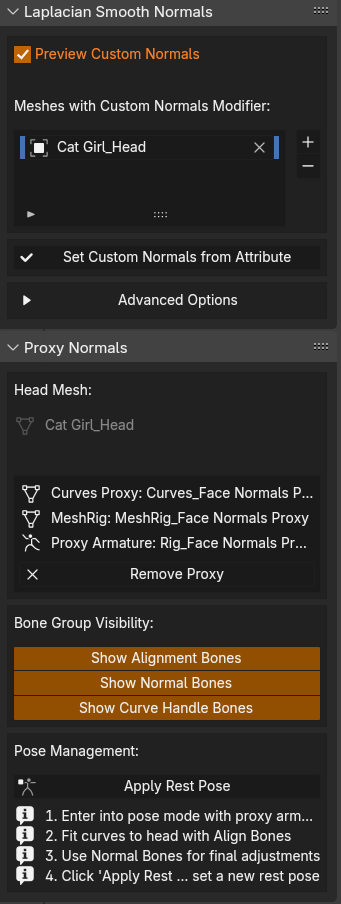
Once added, the various options will appear. The Head will have the Face Proxy Normals modifier added, and also the Laplacian Smooth Modifier after it. It is automatically added to the Laplacian Smooth Normals panel as well so that the Normals Preview will work. The Laplacian Smooth modifier can be disabled or removed if it is not needed. The Normal Preview will work as long as the object remains in the list. (Note that if you do not use the Laplacian Smooth modifier, you need to check the 'Not followed by Laplacian modifier' checkbox on the Face Proxy modifier.)
The addon panel currently only supports one instance of the Proxy setup per file. But the modifiers work fine on multiple characters if you copy the entire Proxy collection for each one, and target the modifiers to the corresponding copies.
The Proxy Collection
The setup uses an unusual but powerful approach to rigging curves with all the power of Geometry Nodes while keeping the convenience of typical Armatures (which are still more user friendly than Geometry Nodes Gizmos for this use case.)
Rig_Face Normals Proxy Controls the MeshRig. It has several Bone Collections that can also be toggled from the addon panel.
MeshRig_Face Normals Proxy Controls the Curves. Geometry Nodes cannot input armatures to get bone information. So to get it, a mesh object is made that consists of a triangle rigged to each bone and aligned to it. This is input into Geometry Nodes, and the triangle's normal and the position of its base and tip are used to reconstruct the bone's location and orientation. Since it is going into Geometry Nodes, transform information from bones can be converted into arbitrary attributes, allowing many custom controls. Having this mesh representation of the Rig also allows it to be shape keyed.
Curves_Face Normals Proxy A Geometry Nodes modifier on this object generates the Bezier Curves. The MeshRig is inputted and used to define the location of each curve's control point and handles. This is convenient because Curves can not usually be rigged to bones without using Hooks, which are tedious.
Custom Bone Shapes_Face Normals Proxy A collection of custom bone shape objects for the Rig.
The target Head will also be linked into the Proxy collection.
Aligning Objects
The setup relies on transferring data between the Proxy Curves object and target Head Mesh. This transfer is based on proximity. The Objects must be aligned properly and then the bones positioned around the Face.
The character should face forward (down the Y Axis) The Face Proxy has roughly the size and position of a typical anime character's head assuming standard scale and orientation in Blender. The character should be pointing towards the negative Y axis so that it is facing the camera when using Front View (Numpad 1).
Project scale should be 1 Blender Unit = 1 Meter If this is not how your character is set up, it is strongly recommended that you adopt this as the standard orientation and scale for your projects as this gives the best compatibility across the Blender ecosystem, and is the expected scale of Blender's physics and lights. It should be possible to adjust the proxy objects to fit other orientations and scales, but this has not been extensively tested as of the initial version (addon version 2.1.0)
Avoid any Object Rotation or Scale The setup may not work properly if there is any Rotation or Scale on the target Head Mesh, its rig, or any parent objects. Or if any is added to the Face Proxy objects (if you are changing their orientation or scale, use the proxy armature Root Bone to rotate and scale and then apply a new rest pose.) Rotation and Scale can be applied with Object Menu > Apply.
The Objects can have their Origins in different places if you use the modifier Alignment options The Object Input section of the Face Proxy Normals and Face Proxy Curves modifiers has options to align objects with their origin points in different locations. (Link to Modifier Parameters page.) These allow the transfer to work even if the Proxy Curves are not overlaying the Face as long as the correct options are selected. For simplicity, you can always set all the relevant Object's origin points to 0 (including the Proxy Objects.)
 The Head and Curves are offset from each other on X, but the Align World X Option compensates for this.
Procedure to align the Objects Select the Curves, Rig, and MeshRig and move them together so their Origin point is roughly in the middle of the target Head, and at 0 on X and Y. It does not matter where the Origin of the Head is due to the default 'Use World(Relative) Space' option. The Curves can be offset on X from the rest by default due to Align World X on the Face Modifier. The Rig and MeshRig Objects can also be offset based on the settings in the Curves Modifier, but they must both have their origins in the same place as the Armature modifier does not allow offset.
Planned for a later version
Automatic alignment of Objects by the Addon, better handling of different orientations and transforms (or at least warnings).
Aligning the Proxy Rig to the Face
The Rig has several layers of bones. Their visibility can be managed from the Addon's tab, or in the Rig's bone collection tab.
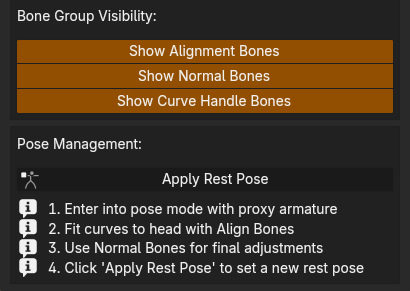
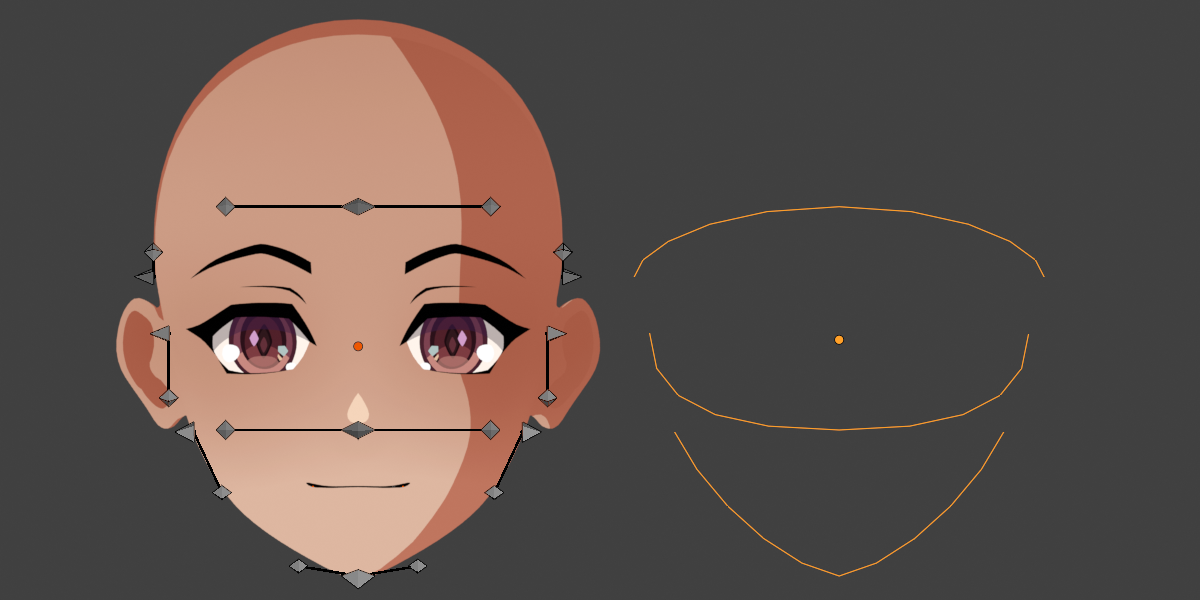
Use the Alignment bones to position the rig around the Face * Snap the Root bone to match the location of the head bone of the character's rig. They must have exactly the same Location if the Proxy Rig is being attached to the character's rig as the Root will be parented to the head bone. Do not rotate the Root bone. It must point straight up in the Rest Pose. * The alignment bones in the center of the head control each curve spline profile. The target bone at the front moves with them. From lowest to highest, place them roughly at the end of the jaw line under the ear, in the middle of the ear, and a bit above the ear. The spacing does not have to be perfect and can be adjusted at any time. * Position the Spline Target bones at the chin tip, at the base of the nose, and at the brow line where the forehead starts. They do not need to be precisely on the surface, but keeping the curves a bit above it makes it easier to see what's going on.
 Alignment Steps: Base Pose, Aligned Root and position for Spline bones, position for spline target bones
Use the Curve Handle Bones to adjust the curve position relative to the Face * The Curve Handle Bones are like Bezier Curves. The Control Points can be moved, rotated, and scaled and their handles move with them. The rotation and scale of the actual handles does not matter, only their location. * The Curve Handle bones are mirrored. Make sure you have Blender set to mirror the pose. Or copy and mirror paste the pose after doing one side. You would almost never want asymmetry in the base pose, but symmetry is not forced by the setup as you may want it in specific shots for asymmetrical expressions or lighting. * Adjust the curves to match the face shape. It doesn't need to be very precise unless you are trying to match existing loops in the mesh, such as a jaw line loop.
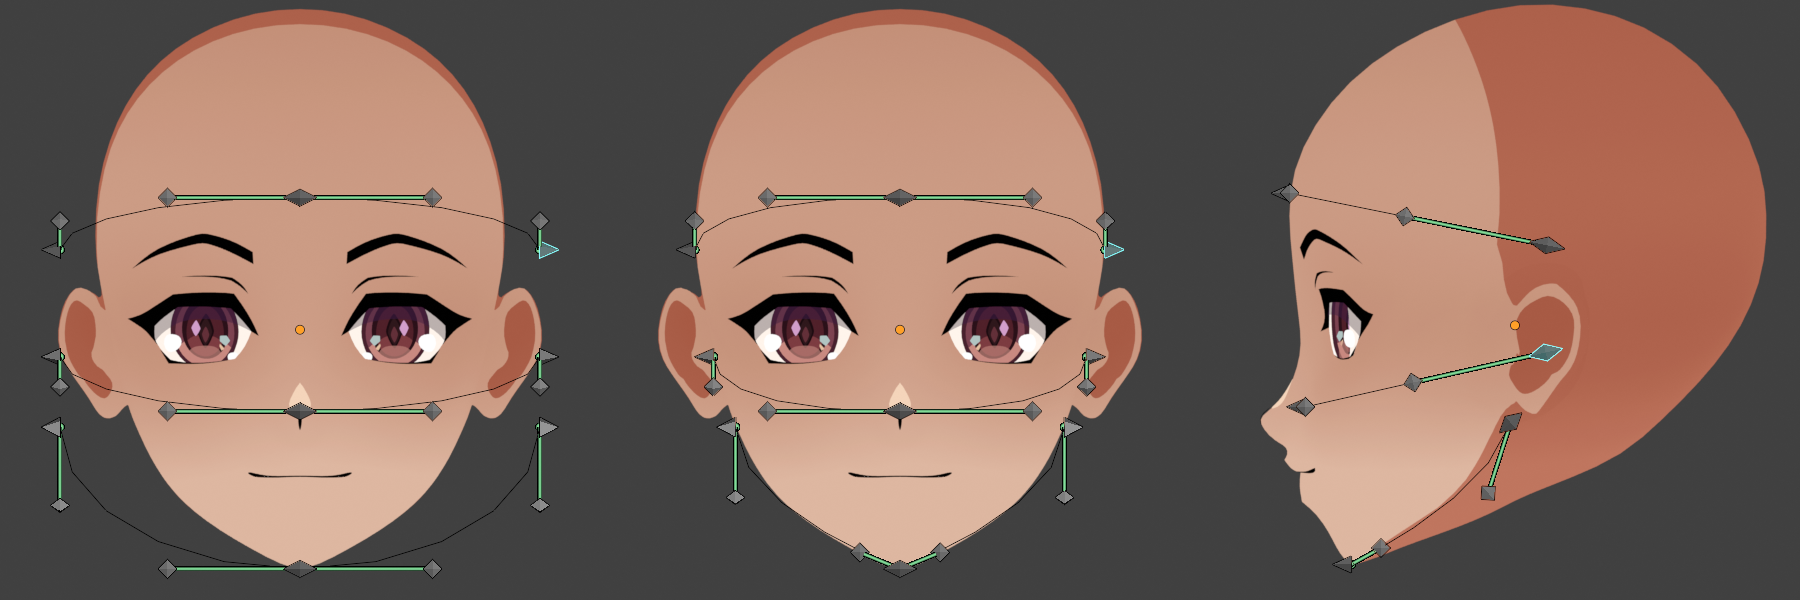 Before using the Curve Bones, and after from front and side.
- The Curve Control Point bones are children of the Alignment bones. It is fine to move them away, or to go back and adjust the alignment more. The distinction is only for convenience. What matters is the final position of the curves relative to the Face.
- It does not matter if there is a gap between the curve and the face mesh, or if the curves clip inside. The transfer space is calculated by radially projecting the face and curves both into a sphere from a point at the center of each curve's ends. So it matters where the Curve is on the Face surface, but not how far away it is.
 There is no difference between these because the gap is in the same direction as the projection.
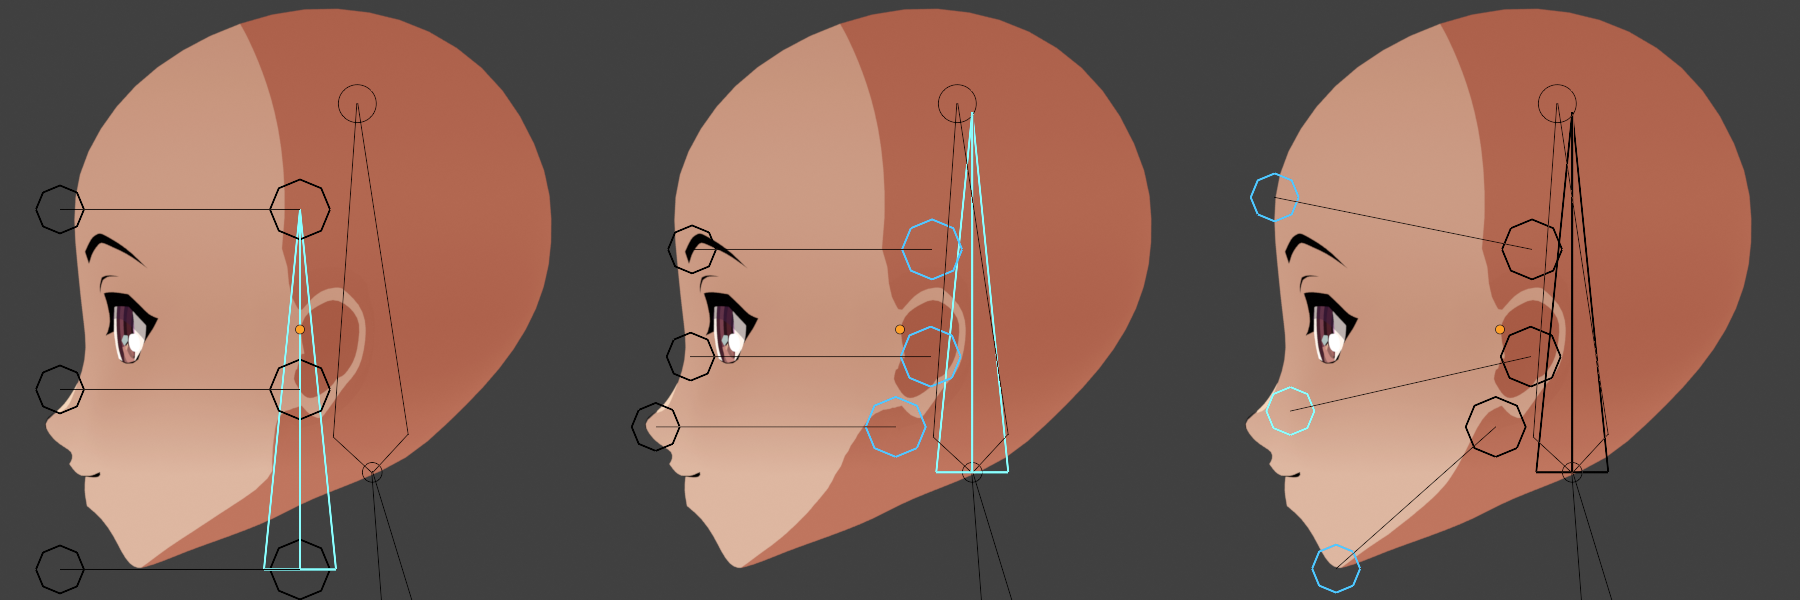
Use the Normal Bones to define the actual Normal direction * Unlike mesh proxies, the Normals in this setup are arbitrary. They are defined by the direction of the Normal Bones. These are children of the Control Point bones and so will face in the same direction by default. But they can be set to point in any direction. * In the above pictures, the Control Point Bones have only been moved and not rotated. So the Normal Bones for each curve are pointing straight forward or sideways. As they are the same for each spline, they are not defining any curvature to the Normals. Angle them to roughly match the head mesh to get a simplified approximation of the head shape. * Finalize the setup with the Apply Rest Pose button in the addon panel. This applies the armature modifier on the MeshRig object and then re-adds it as well as setting the Rig's rest pose. You can keep making adjustments and re-apply the Rest Pose as needed. If you are not planning to use Shape Keys on the MeshRig, then the rest pose only really matters for being able to revert to the default pose.
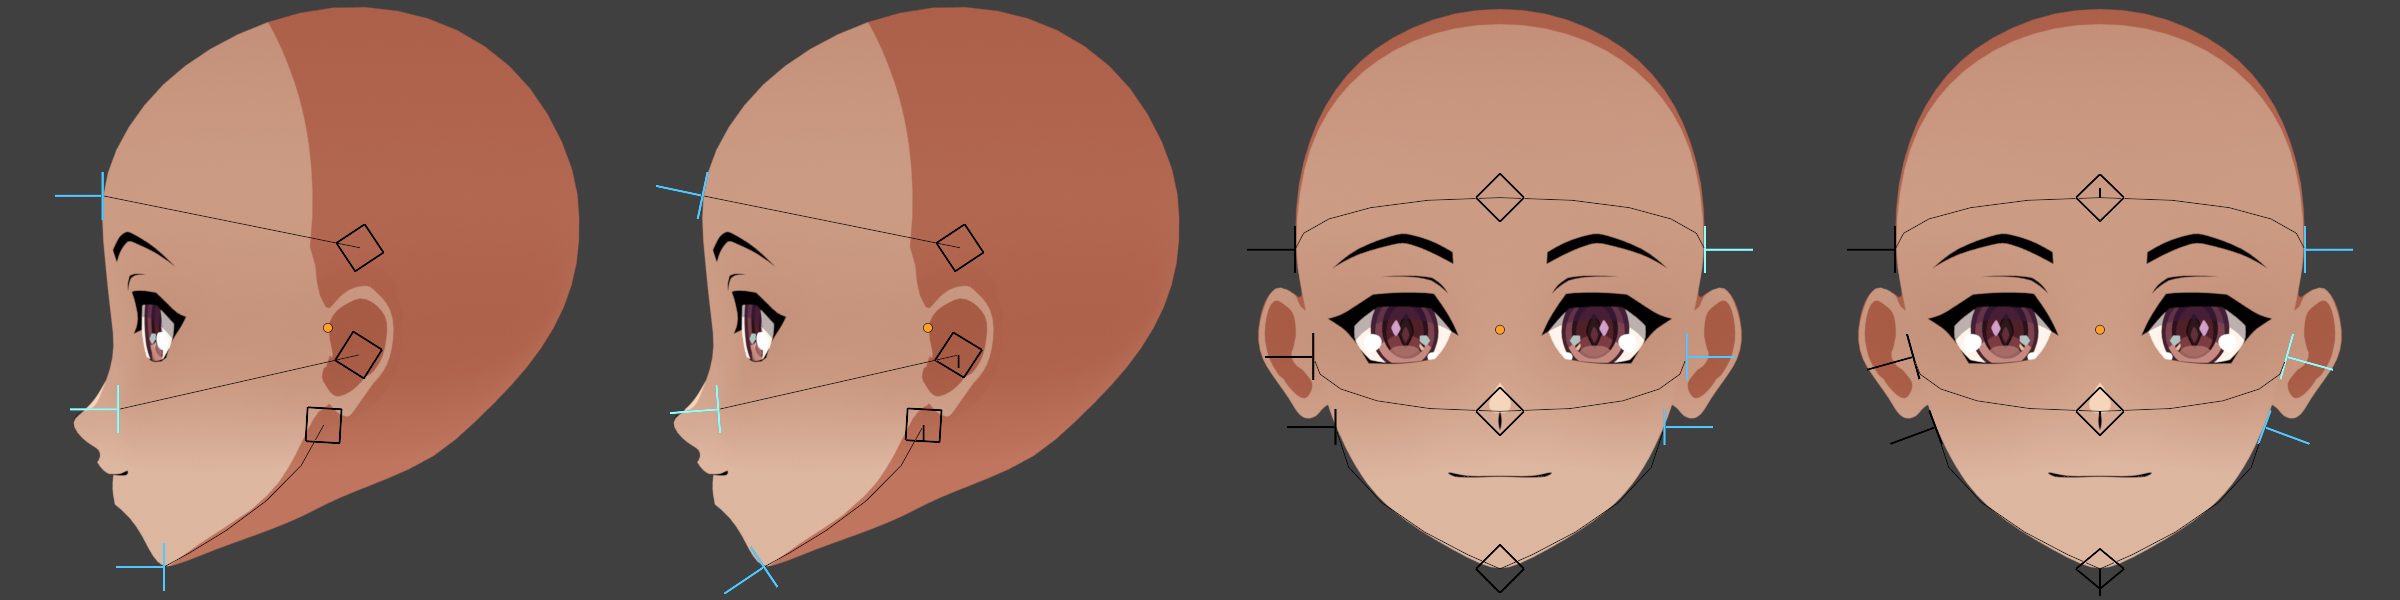 Before and after angling the Normal Bones to create curvature.
Planned for a later version
Auto detect some of the fitting process based on the input head.
Attaching the Proxy to the Character's Rig
Parent to the character's rig Use the 'Child Of bone' constraint on the Root Bone to parent it to the character's head bone, then press 'Set Inverse'.
Merge with the character's rig You can merge the Proxy Rig into the character's rig with the regular merge command. Parent the Root bone to the head bone with Offset. It may help organization to create a new Bone Collection on the Proxy first that contains all its bones.
The Root Bone must stay perfectly vertical and not be rotated in rest position Some calculations of the Proxy are performed in World Space. Since the setup may be rotated by the head bone, World Space must be restored by inverse rotating back to rest position. Then after the calculations are finished, it is rotated to match the pose again. The setup gets the head bone rotation by comparing the root bone's current rotation to being straight up with no rotation. So if this is not always its rest position, then it will rotate by the wrong amount and look wrong.
Avoid Object Transformations on the Armatures The setup has not been stress tested for object transforms on the rigs as this is not something usually done for character animation. It might be fine, or it might mess up the root bone.
Planned for a later version
Automatic rig attachment and merging options.
Adding Expression Shape Keys
Since the Proxy uses proximity transfers, it will effectively ignore expression keys. It projects the Normals over them. For expressions like eye blinks, this is generally the desired behavior. But for keys that change the overall shape of the face, like opening the jaw, the alignment with the proxy will be lost. If the chin moves down, then the point previously at the chin tip will now transfer Normals to above the chin and mess up the jaw line. Or you may have expressions like cheek puffs that don't cause alignment problems per se, but ought to have different shading.
Usually bones cannot be shape keyed and instead must be driven with Actions. But this setup uses the MeshRig to get the armature data into Geometry Nodes. Since there is already a mesh representation of the rig, it is easy to shapekey it.
To setup a shapekey that corresponds to an expression key:
- Enable the shape key on the character's face and set its value to 1.
- Adjust the Proxy to match the expression.
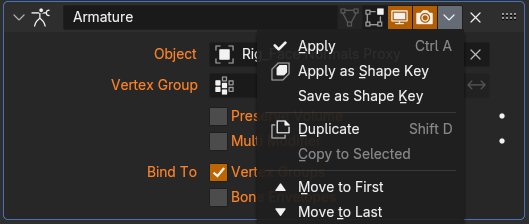
- On the MeshRig object, use the 'Save as Shape Key' option on the armature modifier to add the shape key.
- On the Face mesh, right click the expression key's value slider and 'Copy as New Driver'.
- On the MeshRig, right click the value slider of the shapekey and 'Paste Driver'.
- Set the proxy rig back to rest mode.
- Now the influence of the expression on the face will be copied to the MeshRig and keep its position synced up as keys are changed. Note that this does mean it will not be aligned with the Proxy Rig when keys are enabled. This can get complicated when dealing with multiple blended keys and also trying to make other adjustments, but that is the nature of shape keys in general.
Planned for a future version
Automatic shape key driving.
Controlling the Shading Shapes Artistically
As long as the proxy is aligned correctly and the face mesh has sufficient density, you will get relatively simple and clean shading. But there is still a lot of nuance to the shape of the Normals, what shading appears where, and at what light angles. Artistically we tend to think in terms of shading shapes like a clean shading terminator line down the cheek. But these shapes are the visual output of the surface we are defining. They can happen in the wrong places, or be inconsistent with each other. And it is also common to get things looking right from one angle at the cost of another.
The best way to achieve a specific result will depend on your setup. Understanding the Proxy's behavior will help to figure it out.
The Normal Bones define the shape
Each Curve has Normal Bones at each end and in the center. The value of these Normals is interpolated across the curves. So the Direction at a point on the curve halfway between the side and front will be the average of those Normals.
The Curves define what part of the shape goes where
The placement of the Curves around the Face defines what data is transferred to any given area of the Face. Adjusting the curves is effectively the same as adjusting what area of the face they transfer their Normals too. Typical proxy meshes with Nearest Surface/Face Interpolated transfers work like this, but tend to break down due to gaps between the meshes messing up the transfer, which makes it difficult to use it artistically as a control. That doesn't happen here because of the radial projection used to line up the mesh and curves.
Both influence how things look, but in different ways
If you are looking at just one area, you can end up with roughly the same shading shapes by adjusting either the Normals or the Curves. But the results in other areas will be different depending on how you did it. So beware of setting everything up based on only one camera and/or light angle.
Understanding what this means visually
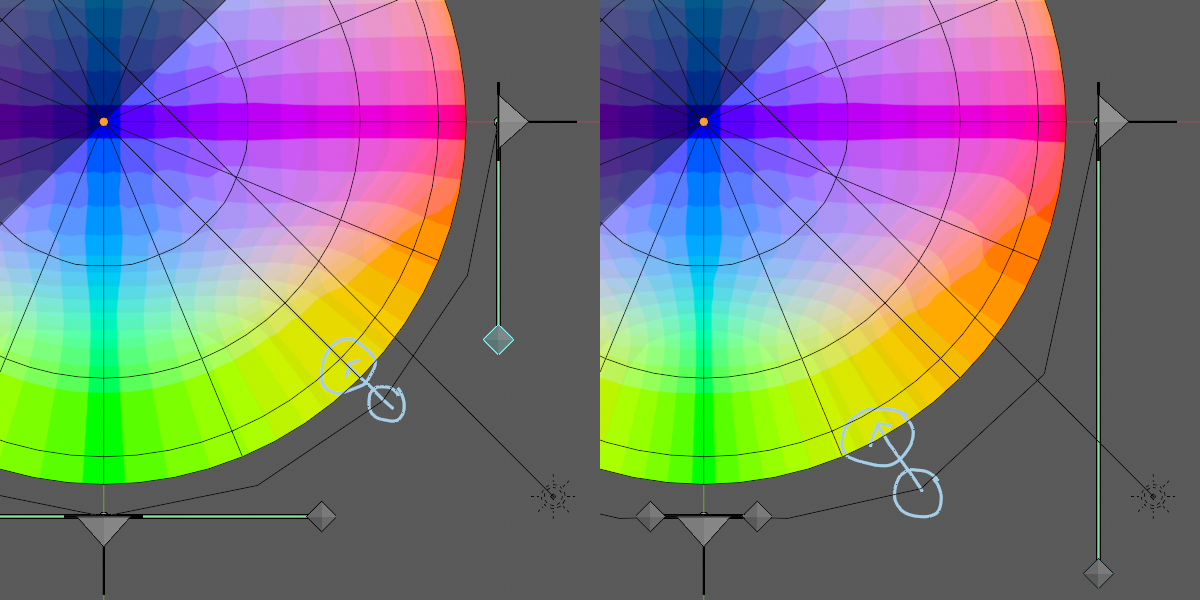
This simplified setup is a top down view of the rig and a sphere.
Since the bone handles are perpendicular and the same length, the curve segment is a quarter circle. So the midpoint of the segment corresponds perfectly to the sphere. But when the handles are changed, the midpoint on the curve now corresponds to a different area of the surface, and so its value will go there instead.
The Radial Projection vector
To understand how the surface and curves correspond to each other, imagine a line that starts at the average position of the curve's end points, and radiates outwards through a given curve point. This is the projection vector. The point on the surface it passes through is the point that will have the same value as the point of the curve.
This means that the shape of the curve and distance from the surface does not actually matter, only the correspondence to the surface when doing this projection. This can get confusing because, if you are used to working with proxy meshes, you may think of the shape as the curve as being the shape you are creating. But it is not, it is merely placing the shape made by interpolating between the Normal Bones along the curve.
This picture shows two very different curve shapes. But there is actually almost no difference here for two of the points. The lower two points are in almost the same place relative to the surface when projected. The upper right point is quite different. This also demonstrates why if you were only examining the shading where it crosses the first two points, you would think these are the same. But as it moves around to the third, it would be different.
