Face Proxy Normals Modifier Parameters
This section describes the inputs of the Face Proxy Normals and Face Proxy Curves modifiers and suggested settings.
Face Proxy Normals Modifier
Using Attribute Normals instead of Custom Normals
The Addon stores the calculated Normals as an attribute called '_GN_Custom_Normals'. Instead of setting Custom Normals with the addon (or node in 4.5), this Attribute can be used directly in your material via the Attribute Node. Be sure to use a vector math Normalize Node, then plug it into the Normal Sockets of any nodes you want to use it. Inverting the Normal on backfaces is also recommended. If your Objects have transforms, they are not included in the Attribute unless 'Apply Object Transforms' is checked on the Laplacian Smooth modifier.
Blender 4.5+
Blender 4.5 added the ability to set Custom Normals directly from Geometry Nodes via the Set Mesh Normal Node. The options of this node have been surfaced on both the Laplacian Smooth and Face Proxy Modifiers. The default 'Free' Normals mode gives the same behavior as before. The 4.5 version of the addon removes the Preview feature, as it is no longer necessary for the addon to set the Custom Normals via Python.

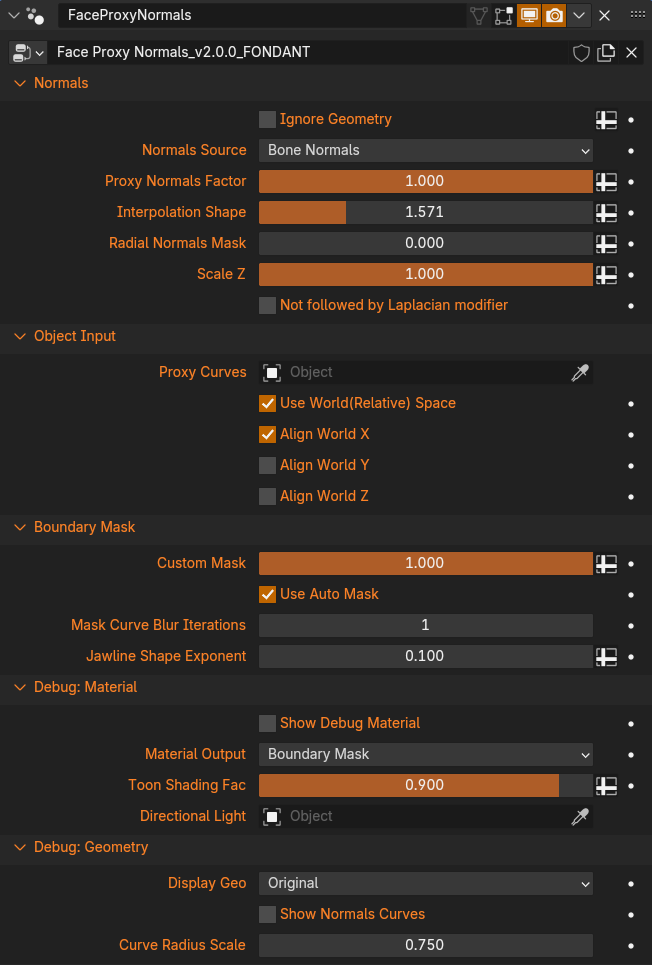
Normals
Ignore Geometry Use a vertex group or attribute to select geometry that will not be evaluated (click the + button on the right to select a group or attribute). Use this for areas like inverted hull geometry, or transparent or shadeless areas. The Ignored geometry is internally split off, converted into a geometry nodes instance, and then recombined. It will also be ignored by the Laplacian Smooth modifier.
Normals Source Choose to use either Bone Normals or MeshRig Normals. The Bone Normals are defined by the directon of the Normal Bones. The MeshRig Normal is the Face Normal of the Mesh Rig triangles that define the control points, which is effectively the same as the Normal of the actual Curves. If the Normal Bones have not had their pose changed, these will be the same thing. This is mostly intended as a debug option as the Normal bones add more control but don't have to be used anyway.
Proxy Normals Factor Overall mix factor between the Proxy Normals and regular mesh Normals, or Weighted Normals if the Laplacian Smooth modifier is being used. Use this for masking if you want to keep some areas for detail, such as the nose.
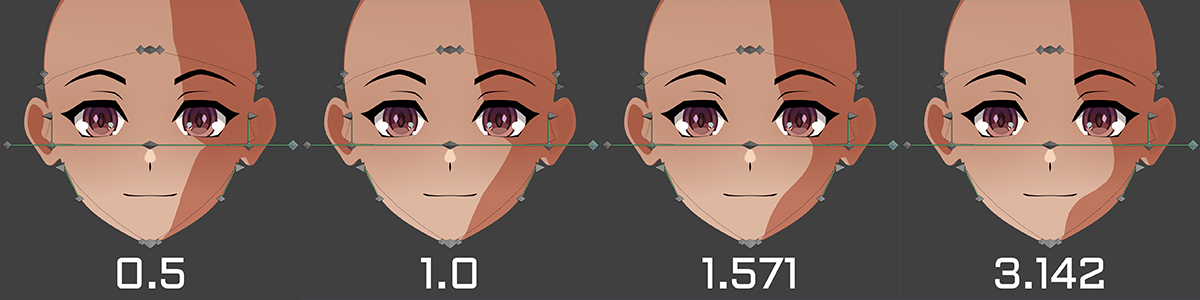
Interpolation Shape An exponent that defines the shape of the interpolation between the curve profiles. Uses the Power math node. A value of 1 is Linear Interpolation, which may cause a hard corner where the shading passes over each curve. This is only visible if the Normals are different enough, such as if the control handles of one curve are scaled to 0. Values above 1 smooth, and below 1 sharpen. The default is 1.571 (half of pi) to get a smooth interpolation, similair to Smoothstep. Higher values will get more spherical as it approaches pi.
Radial Normals Mask A mix factor for Radial/Sphere Normals. Can be painted in with a vertex group to simplify the shading on areas likes ears or the back of the head.
Scale Z Mix factor to flatten the Proxy Normal's vertical axis. This will lock the Normals to only respond to horizontal directional light changes if set to 0, similair to how lighting works in many 3D anime games. Use this to avoid bad shading wrapping around the bottom of the chin when the head moves. May not give very good results with point lamps or other Normals effects. This applies only to the Proxy Normals, and not those created on the rest of the head by the Laplacian Smooth modifier.
Not followed by Laplacian modifier If for some reason you are not using the standard setup that puts a Laplacian Smooth Normals modifier after the Face Proxy Normals, then check this box (or when debugging if the Laplacian modifier is disabled.) This enables using the regular mesh Normals in areas that are not getting Proxy Normals due to masking (such as the back of the head.) If off, the Proxy Normals are passed to the Laplacian Smooth on their own with everything else set to 0 so that Weighted Normals can fill those areas.
Object Input
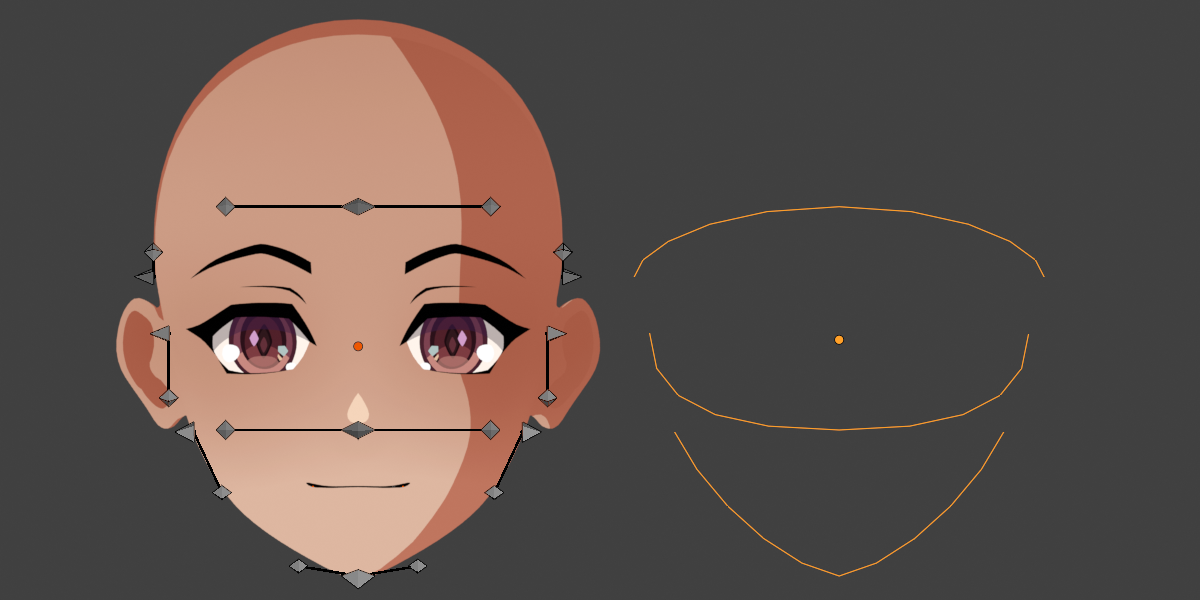
Proxy Curves The Proxy Curves object. Should be filled by default if using the Addon to set everything up.
Use World(Relative) Space Defines the space that the curent and inputted Objects will be evaluated in. For a proper data transfer they need to be lined up. If disabled, the transfer takes place in Object Space. This is the same as if all Object Transforms were cleared so their origin points are at 0,0,0. In other words, if their origin points are in different places, it will not work properly. If Enbled, then World Space is used, which means Object transforms are counted. If they are visually aligned properly in the viewport, it will work.
Align World X/Y/Z Moves the inputted object to match the current object on the specified axis. Use this if you want to be able to visually offset the Objects from each other but have the transfer still work. This is useful for moving the Curves to the side of the head as they will often clip into it and be difficult to see.
 The Face and Curves can be offset on X as long as Use World and Align World X are checked
Boundary Mask
Custom Mask Use this if you want to paint your own mask. Not used if Use Auto Mask is checked.
Use Auto Mask Will procedurally mask the Proxy Normals to the face, but exclude the rest of the head. A new curve is created matching the lowest curve profile, then runs up the sides to the top of the head. An SDF mask is then calculated from this curve. This mask can be viewed with the Debug Material.
Mask Curve Blur Iterations Blurs the Mask Curve, making the masked area smaller and smoother.
Jawline Shape Exponent To get a clean curve around the jawline, it is necessary to sharpen the mask in that area. Lower values = sharper. Note that how good this actually looks depends on the vertex density in this area. Having multiple loops along the jaw line is recommended to support a smooth curve to under the chin.
Debug: Material
Show Debug Material Replaces the materials of the entire object with the Debug material.
Material Output Choose what is displayed by the debug material with Toon Shading overlayed.
- Final Normals (Absolute): The actual Normals, but their Absolute Values so half the mesh isn't black.
- Masked Proxy Normals: The Proxy Normals only, not Normalized after masking. This is what is passed to the Laplacian Smooth to mix with its Weighted Normals.
- White: Just white for looking at the toon shading more clearly.
- Curve Influence: Shows each curve's influence from black to white (inverted, but easier to look at). Use to see exactly what vertices are being influenced. Useful for lining up the curves with key areas like the jawline, and for checking that the objects are aligned properly when transferring.
- Boundary Mask: Use for viewing the Auto Boundary Mask, or when painting your own.
- Radial Normals Mask: Use when painting in Radial Normals while previewing shading.
Toon Shading Factor The mix factor for multiplying the Toon Shader over the rest of the material. The Toon Shading is simply a Greater Than 0 on a Diffuse shader, as this provides the highest contrast to see what the Normals are actually doing.
Fake Directional Light Due to limitations of Eevee, creating Toon Shading via the typical Diffuse Shader and Shader to RGB method does not work well with certain light settings. For it to work properly without other influences, the World Lighting must be disabled, and the Light source must be a single white sun lamp with strength pi and angle 0. If this isn't your light setup, you can instead select an object here and the toon shading will instead be calculated based on the object rotation as if it were a Directional Light (Sun Lamp) using dot(n,l). It can be any object, only the Rotation matters. This will be slightly different from a Diffuse shader as those also have some attentuation/falloff, but not in a way that matters.
Debug: Geometry
Display Geo Use to check for issues in the transfer space between the Face and the Curves.
- Original: No change
- Radial Position: The Face and Curves are Cast into a sphere from a vertical line between the end points of each curve. Automatically scaled based on the height of the Face object's bounding box. If the whole character is in one object, this will get weird.
- UV Position: The Radial position unwrapped to UVs, like an Icosphere.
Show Normals Curves Shows the Curves, but with some thickness, and in the Display Geo position. Use to check that the curves properly correspond to the same areas of the face in the transfer space as they do in world space.
Curve Radius Scale Scale the curve thickness.
Face Proxy Curves Modifier
Curve Resolution The number of edges between each bezier control point. Needs enough points to represent the shape created by the control point handles, but more doesn't do much unless the curve is very long.
Object Input Same as above.